Since a few months, developers are wondering what should be used for their acceptance tests in a new project. CasperJS Team hasn’t released any update for a long time. Protractor never really convinced the Angular community, therefore it does not seem to be a solid solution. Luckily, the JS community came to the rescue ! Here comes Nightwatch (no, it’s not related to Game Of Thrones …)
(French version is here : https://www.ux-republic.com/introduction-a-nightwatch-tests-dacceptance-ultra-rapides/)
Presentation
![]()
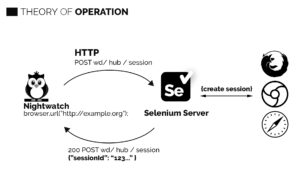
First, let’s see an illustration that sums up pretty well how Nightwatch works and how it interacts with Selenium and the browser itself.
Nightwatch differs from its constentant in many ways:
- As said previously, its syntax is still pretty classy
- It’s easy to extend (by the way, we will see how to do this later)
- It contains the Page Object pattern out of the box
- With Selenium under the hood, you should enjoy this plateform’s ecosystem. I’m thinking of Sass tools like BrowserStack or SauceLabs and all webdrivers for instance. Moreover, they can be run through all browsers.
- A the best, the Killer feature : Nightwatch is able to parallelize your test suite !
Well, show me the code !
Getting Started
Before starting, we will see a tree’s boilerplate project created for this specific article:
├── nightwatch.json
├── nightwatch.globals.js
├── nw
│ ├── reports
│ ├── logs
│ └── tests
└── package.json
If you want directly the complete solution, you should just clone this repository.
As usually, we start with installing the required packages (in the root of the project) :
npm install nightwatch selenium-server-standalone-jar chromedriver –save-dev
the first dependency is the only one which is mandatory. But in order to save time in configuration, we advise to install a package containing the selenium server (it’s just a jar file) and another containing the ChromeDriver.
The next step consists of creating the Nightwatch configuration file. Let’s name it nightwatch.json. The example file looks as following (each field will be explained afterwards):
{
  "src_folders" : ["nw/tests"],
  "output_folder" : "nw/reports",
  "globals_path" : "nightwatch.globals.js",
  "test_workers": {
    "enabled": true,
    "workers": "auto"
  },
  "selenium" : {
    "start_process" : true,
    "server_path" : "./node_modules/selenium-server-standalone-jar/jar/selenium-server-standalone-2.50.1.jar",
    "log_path" : "nw/logs",
    "host" : "127.0.0.1",
    "port" : 4444,
    "cli_args" : {
      "webdriver.chrome.driver" : "./node_modules/chromedriver/bin/chromedriver",
      "webdriver.ie.driver" : ""
    }
  },
  "test_settings" : {
    "default" : {
      "launch_url" : "http://google.com",
      "selenium_port"  : 4444,
      "selenium_host"  : "localhost",
      "silent": true,
      "screenshots" : {
        "enabled" : true,
        "path" : ""
      },
      "desiredCapabilities": {
        "browserName": "chrome",
        "javascriptEnabled": true,
        "acceptSslCerts": true
      }
    },
    "french" : {
      "launch_url" : "http://google.fr",
      "desiredCapabilities": {
        "browserName": "firefox",
        "javascriptEnabled": true,
        "acceptSslCerts": true
      }
    }
  }
}
- src_folders: Directory containing the test suites
- output_folders: Directory containing the test reports
- test_worders: Define whether we want to run test suites in parallel or not. Here we enable the parallelization (enable:true) and we define automaticaly the number of parallel instance in terms of CPU/Core
- globals_path : File where we will setup the globals parameters of the test suites
- selenium : This part defines the general configuration to plug Nightwatch to Selenium. It doesn’t really matter in this article, but please note that we define here the path to the selenium server and the chrome driver.
- test_settings : This part is probably the most interesting because it allows you to define your test environnements. In this example, we define the default environnement parameters and the french environnement parameters. Note that the other environnements inherit of the default configuration. That’s why we only have to override the target url (launch_url) and the browser (desiredCapabilities).
The desiredCapabilites block can seem a little bit odd to choose since it just defines which browser to use. However, this format is an heritage from the Selenium configuration and allows users to configure many parameters in the chosen browser. To learn more about this, take a look at the official documentation.
First Test
It’s time to run your first test. Create the file nw/tests/reseachOnGoogle.test.js. It should contain the following code:
module.exports = {
    'Search on google': (browser) => {
        browser
            .init()
            .waitForElementVisible('body', 1000)
            .setValue('input[type=text]', 'nightwatch')
            .waitForElementVisible('button[name=btnG]', 1000)
            .click('button[name=btnG]')
            .pause(1000)
            .assert.containsText('#main', 'Night Watch')
            .end()
    },
    after: (browser) => {
        browser.end()
    }
};
This file describes a test suite containing a test ‘Search on google’. First, this test begins with an init used to go on the web page, then we wait that an element is visible with waitForElement, we put a value in the search field with setValue, we click on the search button with click (by verifying that it is present), then we wait one seconde with pause. Finally, the ‘after’ function is called automatically by Nightwatch at the end of the test suit to call the end method.
The call to the end method is very important because it is in charge of closing the browser used to run the test. I advise you to call it at the end of each test suite with the after.
Let’s run now:
node_modules/nightwatch/bin/nightwatch -c nightwatch.json
The result should look like that. A Chrome should run in the same time in background.
Do you want run the test with the ‘french’ environnement now ? Too easy… Just run:
node_modules/nightwatch/bin/nightwatch -c nightwatch.json –env french
No visible change in the console, however, this time a Firefox is run instead of Chrome and it goes on “http://google.fr” instead of “http://google.com”.
The “Globals” to make it simple
The globals file will be useful to simplify your tests by defining some globals parameters. For instance, we have to define each time the timeout duration to find a HTML element. It would be wonderful to be able to define this timeout duration once globally. It iss the kind of possibility given by this file. You can also define hooks for different moment, dynamic environment variables (the Nightwatch configuration file is a declarative json file, so you cannot define dynamically variables)
The configuration file should look as following (comments should definitely help):
module.exports = {
    'default': { // 'default' environnement parameters
        searchTerm : 'nightwatch',
        movieName : 'Night Watch'
    },
    'french': { // 'french' environnement parameters
        searchTerm : 'dikkenek',
        movieName : 'dikkenek'
    },
    // Abord all on test fail
    abortOnAssertionFailure: true,
    // Duration between two checks
    waitForConditionPollInterval: 300,
    // Timeout duration
    waitForConditionTimeout: 1000,
    /*
     * Define if the test failed when many HTML elements are found when
     * we expect only one
     */
    throwOnMultipleElementsReturned: false,
    // Before/After Hooks of all tests
    before: (next) => next(),
    after: (next) => next(),
    // Before/After Hooks of test suites
    beforeEach: (browser, next) => next(),
    afterEach: (browser, next) => next(),
    // To customize output report
    reporter: (results, next) => next()
};
This allows us to refactor the suite easily:
module.exports = {
    'Search on google': (browser) => {
        browser
            .init()
            .waitForElementVisible('body')
            .setValue('input[type=text]', browser.globals.searchTerm)
            .waitForElementVisible('button[name=btnG]')
            .click('button[name=btnG]')
            .pause(1000)
            .assert.containsText('#main', browser.globals.movieName)
            .end()
    },
    after: (browser) => {
        browser.end()
    }
};
You should note the specific dynamic ‘globals’ variables defined for each env. They are quite helpful when your system environnement variables are required.
And in parallel, how is this?
Our configuration runs already the test suites in parallel, so we only have to add a new one. Let’s create a test suitenw/tests/nightWatchIsMovie.test.js like that:
module.exports = {
    'Go To google': (browser) => {
        browser
            .init()
            .waitForElementVisible('body')
            .setValue('input[type=text]', browser.globals.searchTerm)
            .waitForElementVisible('button[name=btnG]')
            .click('button[name=btnG]')
            .pause(1000)
    },
    'Check movie name': (browser) => {
        browser
            .assert.containsText('.mod .kno-ecr-pt.kno-fb-ctx', browser.globals.movieName)
            .assert.containsText('.mod ._gdf', '2004')
    },
    after: (browser) => {
        browser.end();
    }
};
There is a small difference with this new file, we have many tests which are composing our suite.
It executes again our tests et voila !
You have two test suites started in the same time in two differents Chrome browser.
Conclusion & After
With a great configuration file, Nightwatch is an easy tool to use.
Indeed, the minimum configuration is pretty fast to bootstrap and the test suites remains readable and easy to update. The parallelization feature helps you to save a lot of time!
Bonus, the tests results are readable directly from the terminal thanks to xUnit outputs capabilities present in nw/reports directory.
In a next article, we will talk about Pages Object and how to develop complex commands, and some other tips about Nightwatch.
Stay tuned …
