React hooks appeared in version 16.7.0 alpha and are functions that allow to use all the functionality of React classes in functional components. We can thanks to the hooks develop a React application only made of functional components. However, it is interesting to note that functional components using hooks are fully compatible with React classes.
If you want to switch to hooks on your application, you can do it as you go without breaking the rest of your application. These hooks allow, among other things, to replace the state and the life cycle methods of a React class. Since these are not classes, the 'this' keyword is no longer relevant in your code.
There are two rules to know when using hooks:
- Hooks are called at the top level of a component. That is, you cannot call them from a function or subfunction.
- Hooks are called only in functional components. They will not work in a classroom.
To help you and guide you in your developments, you can use the ESlint linter thanks to the following rule: eslint-plugin-react-hooks.
#1 UseState
useState is the first hook we are going to discover. It allows to replace the famous state of a React class. It is defined with its setter on one line:

what have we done here ?
The useState function returns an array. This function takes as parameter the desired initial value.
The first element of the array (name) is a variable giving access to the state value (here UX-Republic).
The second element (setName) is a function that updates the state of the component to have the new values in the DOM.
The following example shows the transformation of a React class into a functional component using the useState hook:
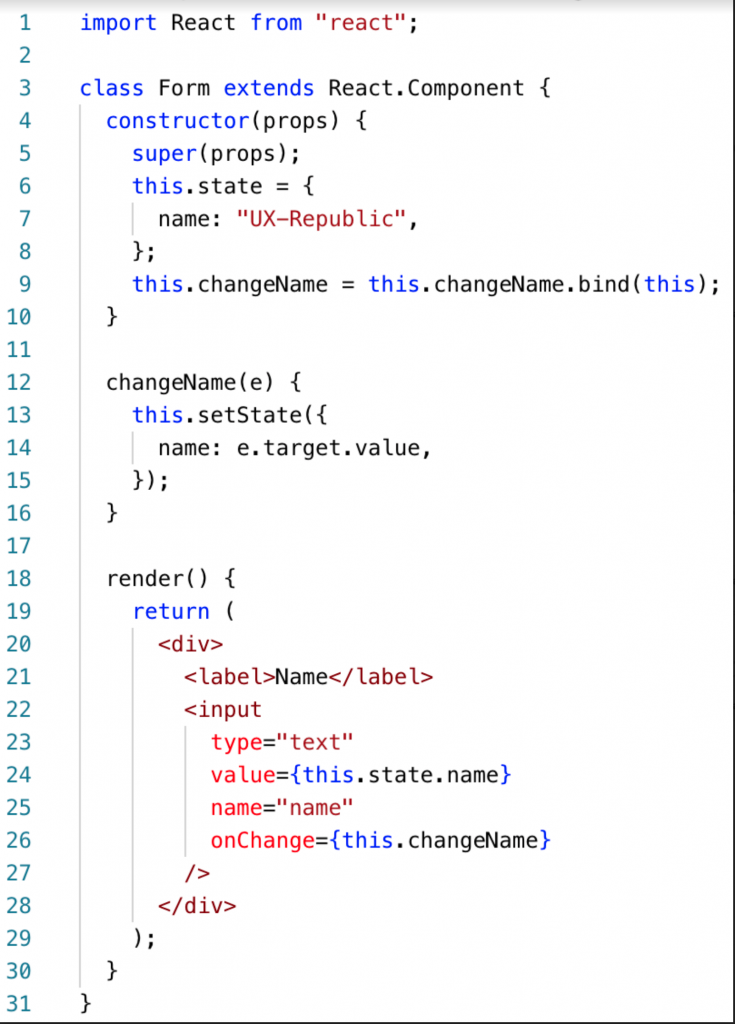
Let's look at the code :
No longer need the constructor, the definition of the variable name and its setter in the useState replaces it. We no longer find 'this' either in the code to access component data.
Finally, to modify the value of 'name' it is enough to call the setName defined in the useState, here too less code is necessary than with the React classes.
UseState is probably the simplest hook offered by React.
#2 UseEffect
UseEffect is the second hook we cover in this article.It allows you to override the lifecycle methods of a React class.
Within a class, lifecycle methods are triggered (as their name suggests) at component lifecycle stages. The hook useEffect is triggered primarily by data sent to this component.
The React class requires us to use its methods.
However, different business logics of a component will sometimes be found in the same method such as componentWillReceiveProps. This complicates the understanding of the methods.
UseEffect provides the ability to separate business logic and makes a component easier to read. How does he do it? You can create as many useEffect methods as you want in a component. We will come back to this after a few examples.
#3 basic useEffect
In a first example we will see how to use useEffect in a simple component which modifies the title of the page when a button is clicked. Here's what a React class that does this would look like.
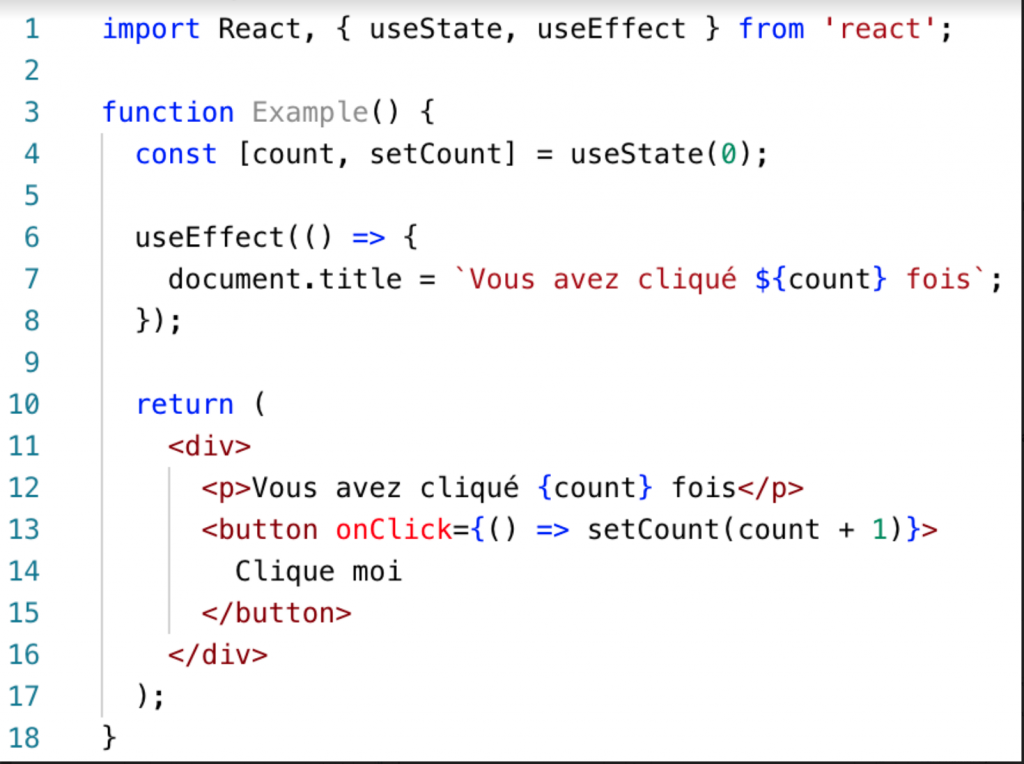
becomes
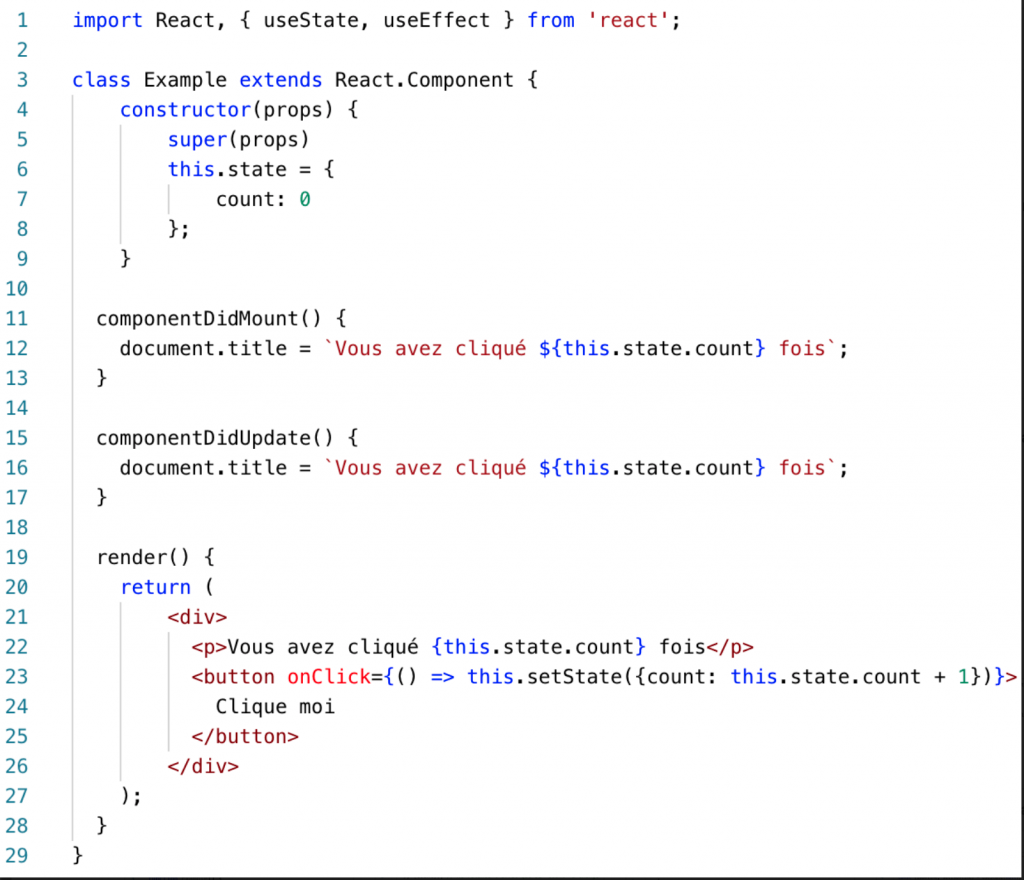
We see that using useEffect simplifies the component and replaces the two lifecycle methods. This method is called when the component is initiated. Also, each time the component updates, the useEffect method will be called. We are no longer really interested in the life cycle of the component here. It is just told that with each update, it must pass in the useEffect method.
#4 useEffect with cleanup effect
We are now going to discover the cleanup effect. It is a functionality of the useEffect which allows to perform an action when the component unmount. To do this, simply add a return of a function you want to execute whenunmount in the useEffect.
here is an example :
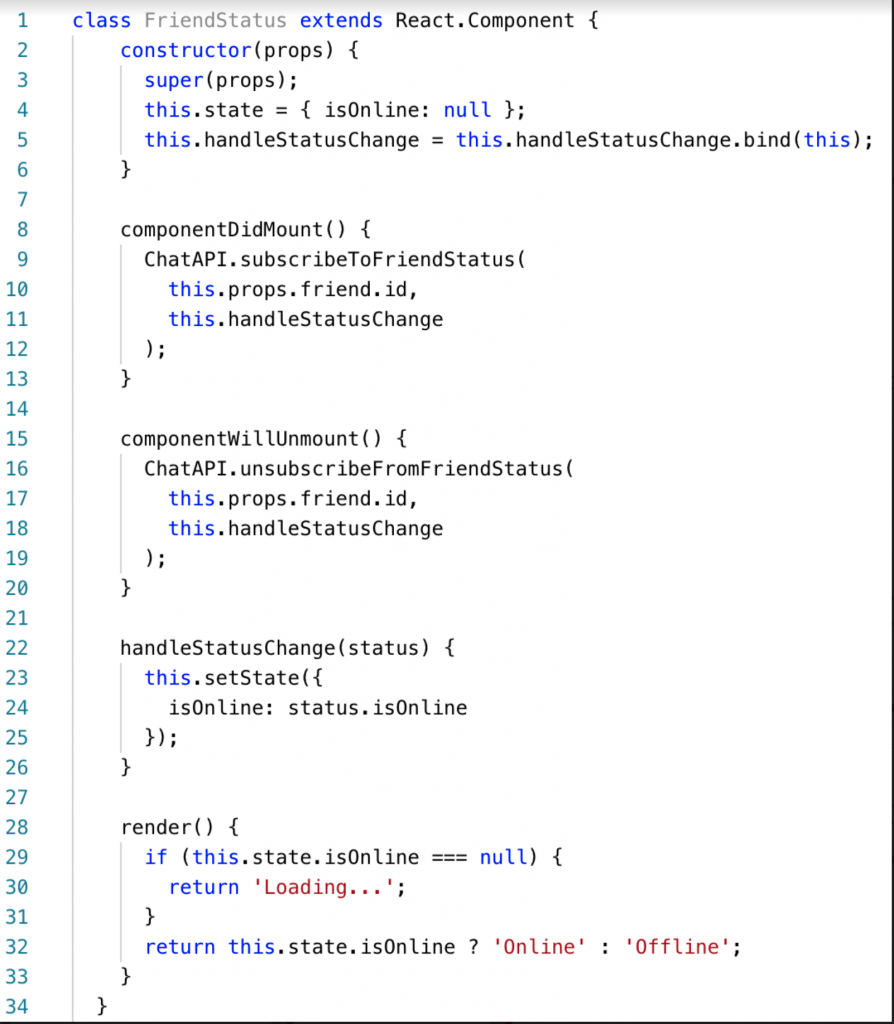
We see in these lines of code that when the component is initialized, we subscribe to the status of a friend via the ChatAPI in order to know if he is online or not. We return this result using the method handleStatusChange and we render it in the render. In order to avoid a memory leak, whenunmount of the component, we unsubscribe to our friend's status via the ChatAPI.
The cleanup effect can help us here to simplify this code with useEffect :
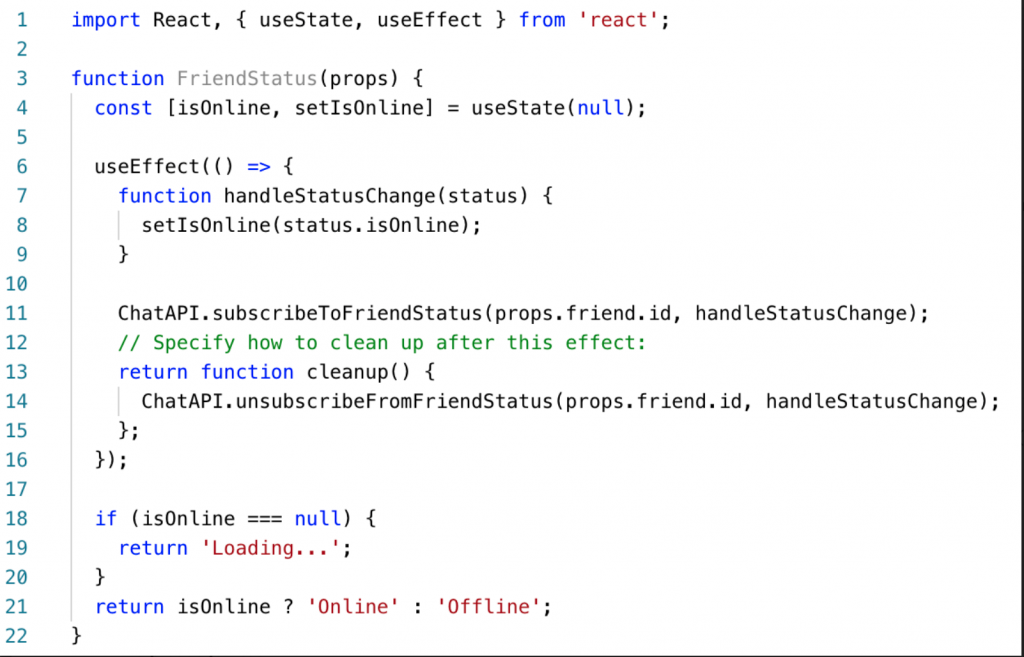
Here we move the function handleStatusChange in the useEffect because it is not used outside its scope. We subscribe to the statute as during the componentDidMount. Finally we added in the return a function cleanup in which we unsubscribe of our friend's status. Once again we gain in place and all the logic is grouped in the same place.
#5 Make good use of the useEffect
Here are some tips for using the useEffect of React Hooks :
- it is better touse multiple useEffect to separate logic and make code more readable. It is interesting to note that the useEffects are launched in the order in which they are written.
- performance can be optimized by passing effects. useEffect is launched each time the component is updated.
Sometimes you will only want to pass in the useEffect if certain values in your component change. Rather than using if loops in the useEffect function to test the update of certain variables, you can pass as the second argument to the useEffect an array with the variables to observe. As soon as one of these variables changes, the useEffect function will be called.
here is an example :

Here we have an if loop that we don't want to transpose to the hooks.

This array that is passed as a parameter of the useEffect contains the data it listens to to launch its code. If this data changes, then it executes its code, otherwise it does nothing. You can see it as a willReceiveProps method dedicated to certain props. In the example above, the document title is updated when count changes value.
For your information, you can pass an empty array to useEffect, in this case, the code will be executed only when the component is created and will not go back into it during updates of this component.
To learn more
You can create your own hooks if you wish. Nothing could be simpler, just define a function whose name begins with 'use' and that this function uses React hooks. There are already many custom hooks on github.
If when using useState, we find that the initialization method of the variable takes a long time, we can do lazy initialization easily. That is to say initialize its variable asynchronously.
Remember, useState takes the default value of a variable as a parameter. We can delay the initialization of the variable defined in the useState until the moment when we really need it by passing a function as a parameter of the useState.
Here is an example implementation :

Here, the initialization of 'value' will be done asynchronously and will not impact the display speed of the rest of the page.
Conclusion
With hooks you can get rid of React classes, the this keyword and all the lines needed to create a component (the constructor, the binding of functions, etc.). You can isolate the different logics involved in the same component and improve its readability.
With custom hooks you can split a component into more functions than with classes.
It is also easier to test our component because the logic to be tested is localized and easier to understand (because it is not interspersed with other logic).
In addition, with this breakdown, you can easily test each part without fear of impact on the other functions.
Personally, I find it more logical to think of your component according to what it receives as props than according to a life cycle. Each component can be optimized by avoiding going through certain hooks.
Overall we need fewer lines of code to achieve the same result while keeping the code very readable.
Biblio :
https://reactjs.org/docs/hooks-intro.html
https://putaindecode.io/fr/articles/js/react/react-hooks/
https://medium.com/@dan_abramov/making-sense-of-react-h ooks-fdbde8803889
https://medium.freecodecamp.org/an-introduction-to-react-hooks-12843fcd2fd9
https://codeburst.io/react-hooks-in-5-minutes-1180f1aa0449
https://blog.bitsrc.io/understanding-react-hooks-usestate-6627120614ab
Valentin Dupetitpre, JS Craftsman @UX-Republic
UX/UI ECO-DESIGN # Paris
SMILE Paris
163 quay of Doctor Dervaux 92600 Asnières-sur-Seine
DESIGN THINKING: CREATING INNOVATION # Belgium
UX-REPUBLIC Belgium
12 avenue de Broqueville - 1150 Woluwe-Saint-Pierre
MANAGING AND MEASURING UX # Paris
SMILE Paris
163 quay of Doctor Dervaux 92600 Asnières-sur-Seine
DESIGN SPRINT: INITIATION & FACILITATION # Paris
SMILE Paris
163 quay of Doctor Dervaux 92600 Asnières-sur-Seine
UX-DESIGN: THE FUNDAMENTALS # Belgium
UX-REPUBLIC Belgium
12 avenue de Broqueville - 1150 Woluwe-Saint-Pierre
GOOGLE ANALYTICS 4 #Paris
SMILE Paris
163 quay of Doctor Dervaux 92600 Asnières-sur-Seine
ACCESSIBLE UX/UI DESIGN # Belgium
UX-REPUBLIC Belgium
12 avenue de Broqueville - 1150 Woluwe-Saint-Pierre
EXPERIENCE MAPPING # Paris
SMILE Paris
163 quay of Doctor Dervaux 92600 Asnières-sur-Seine


